Saturday, 13 October 2012

Pure CSS3 Buttons For Your Blog Or Website

,
This time we are sharing cool CSS3 buttons set.This button set contains buttons of 6 different colors (pink,green,blue,red,orange and yellow) and 2 sizes (large and medium). You can add these buttons in 2 steps into your blog or Website, also the usage of the buttons are easy. You can add more colors if you know some css3. CSS3 buttons are really very use full for any blog or website cause they are load fast and does not impact on your load time. Now lets go to the the tutorial and see how to add them and use them.


Pure CSS3 Buttons

The CSS3 Code


.button, .button:visited {
 background-color: #222;
 display: inline-block;
 padding: 5px 10px 6px;
 color: #fff;
 text-decoration: none;
 -moz-border-radius: 6px;
 -webkit-border-radius: 6px;
 -moz-box-shadow: 0 1px 3px rgba(0,0,0,0.6);
 -webkit-box-shadow: 0 1px 3px rgba(0,0,0,0.6);
 text-shadow: 0 -1px 1px rgba(0,0,0,0.25);
 border-bottom: 1px solid rgba(0,0,0,0.25);
 position: relative;
 cursor: pointer;
 font-family: calibri;
}
.button:hover {
 background-color: #111;
 color: #fff;
}
.button:active {
 top: 1px;
}
.small.button, .small.button:visited {
 font-size: 11px
}
.button, .button:visited,
.medium.button, .medium.button:visited {
 font-size: 13px;
 font-weight: bold;
 line-height: 1;
 text-shadow: 0 -1px 1px rgba(0,0,0,0.25);
}
.medium.button, .medium.button:visited {
 font-size: 14px;
 padding: 8px 14px 9px;
}
.large.button, .large.button:visited {
 font-size: 34px;
 padding: 8px 14px 9px;
}
.pink.button, .magenta.button:visited {
 background-color: #e22092;
}
.pink.button:hover {
 background-color: #c81e82;
}
.green.button, .green.button:visited {
 background-color: #91bd09;
}
.green.button:hover {
 background-color: #749a02;
}
.red.button, .red.button:visited {
 background-color: #e62727;
}
.red.button:hover {
 background-color: #cf2525;
}
.orange.button, .orange.button:visited {
 background-color: #ff5c00;
}
.orange.button:hover {
 background-color: #d45500;
}
.blue.button, .blue.button:visited {
 background-color: #2981e4;
}
.blue.button:hover {
 background-color: #2575cf;
}
.yellow.button, .yellow.button:visited {
 background-color: #ffb515;
}
.yellow.button:hover {
 background-color: #fc9200;
}

 Add above css codes in your Theme Style Section. Now you have added the styles of buttons, lets see how to use them.


Usage Of These Buttons


1. Large Buttons-
<center><a href="LINK HERE" class="large button pink" >LINK TEXT HERE</a></center>
<center><a href="LINK HERE" class="large button blue" >LINK TEXT HERE</a></center>
<center><a href="LINK HERE" class="large button green" >LINK TEXT HERE</a></center>
<center><a href="LINK HERE" class="large button orange" >LINK TEXT HERE</a></center>
<center><a href="LINK HERE" class="large button red" >LINK TEXT HERE</a></center>
<center><a href="LINK HERE" class="large button yellow" >LINK TEXT HERE</a></center>
2. Medium Buttons-
<center><a href="LINK HERE" class="medium button pink" >LINK TEXT HERE</a></center>
<center><a href="LINK HERE" class="medium button blue" >LINK TEXT HERE</a></center>
<center><a href="LINK HERE" class="medium button green" >LINK TEXT HERE</a></center>
<center><a href="LINK HERE" class="medium button orange" >LINK TEXT HERE</a></center>
<center><a href="LINK HERE" class="medium button red" >LINK TEXT HERE</a></center>
<center><a href="LINK HERE" class="medium button yellow" >LINK TEXT HERE</a></center>
Replace LINK HERE with link URL
Replace LINK TEXT HERE with the text which you want to appear on the button.

Read more →

Thursday, 11 October 2012

Profile Gadget with avatars and post counts

,
Hii Friends Iam reposting this widget this widget has been posted by yabtb.You Can check the original post from here Yabtb-Widget This is especially for multi author blogs. In multi author blog the profile gadget is very simple looking. It only contains author names in <ul>/<li> list. There is "avatar" but that is the default blogger logo.


My multi author blog profile gadget looks like this:


It works on single author blogs, too, and one could customize it to look about the same as the default single author blog profile gadget, but I'll leave that for you as an exercise. :)

Installation is simple. Add HTML/Javascript gadget into your blog, and paste the following code there:

<style type="text/css">
.author-line     {margin: 3px 0;}
.author-avatar   {vertical-align:middle;}
</style>
<script type="text/javascript">
//
// Blog authors gadget, works like multi author profile gadget,
// but with post counts and avatars, ordered most written first,
// by MS-potilas 2012. See http://yabtb.blogspot.fi/2012/06/profile-gadget-with-avatars-and-post.html
//
// CONFIG:
var maxUserNameLength = 42; // 0: don't cut, >4: cut usernames
//
var txtAuthorLine = '[image] [user] has written [count] [post]'; // can also use [#] (=position)
//
var sizeAvatar = 20;
var cropAvatar = true;
//
var urlNoAvatar = "https://blogger.googleusercontent.com/img/b/R29vZ2xl/AVvXsEir1Kp8oA8QTFH7VlDnec8WYg6LnwHgZjrRjvM0D6OLyLkQYe_p4JNMEnH-okwMW_nAz_GpQHM9NijnGFzTXGpdRq8Sz2QhGTMQTyQcrPDXUhEBZXNXs7zw1QQUkd4s2nB3Z0IJOwQvm7Y/"+sizeAvatar+"/avatar_blue_m_96.png"; // http://www.blogger.com/img/avatar_blue_m_96.png resizeable
// config end

function replaceAuthorVars(text, item, position)
{
  if(!item || !item.author) return text;
  var author = item.author;

  var authorUri = "";
  if(author.uri && author.uri.$t != "")
    authorUri = author.uri.$t;

  var avaimg = urlNoAvatar;
  if(author.gd$image && author.gd$image.src)
    avaimg = author.gd$image.src;
  if(avaimg == "http://img2.blogblog.com/img/b16-rounded.gif" && urlNoAvatar != "")
    avaimg = urlNoAvatar;
  var newsize="s"+sizeAvatar;
  avaimg = avaimg.replace(/\/s\d\d+-c\//, "/"+newsize+"-c/");
  if(cropAvatar) newsize+="-c";
  avaimg = avaimg.replace(/\/s\d\d+(-c){0,1}\//, "/"+newsize+"/");

  var authorName = author.name.$t;
  var imgcode = '<img class="author-avatar" height="'+sizeAvatar+'" width="'+sizeAvatar+'" title="'+authorName+'" src="'+avaimg+'" />';
  if(authorUri!="") imgcode = '<a href="'+authorUri+'">'+imgcode+'</a>';

  if(maxUserNameLength > 3 && authorName.length > maxUserNameLength)
    authorName = authorName.substr(0, maxUserNameLength-3) + "...";
  var authorcode = authorName;
  if(authorUri!="") authorcode = '<a class="profile-name-link" href="'+authorUri+'">'+authorcode+'</a>';

  text = text.replace('[user]', authorcode);
  text = text.replace('[image]', imgcode);
  text = text.replace('[#]', position);
  text = text.replace('[count]', item.count);
  if(item.count != 1)
    text = text.replace('[post]', "posts");
  else
    text = text.replace('[post]', "post");
  return text;
}

var blauthors = {};
var blndxbase = 1;
function showAuthors(json) {
  for(var i = 0 ; i < json.feed.entry.length ; i++ ) {
    var entry = json.feed.entry[i];
    var authorUri = "";
    if(entry.author[0].uri && entry.author[0].uri.$t != "")
      authorUri = entry.author[0].uri.$t;

    var authorName = entry.author[0].name.$t;

    if(blauthors[authorName])
      blauthors[authorName].count++;
    else {
      var aut = new Object();
      aut.author = entry.author[0];
      aut.count = 1;
      blauthors[authorName] = aut;
    }
  }
  if(json.feed.entry.length == 500) {
    blndxbase += 500;
    document.write('<script type="text/javascript" src="http://'+window.location.hostname+'/feeds/posts/default?redirect=false&max-results=500&start-index='+blndxbase+'&alt=json-in-script&callback=showAuthors"></'+'script>');
    return;
  }
  var tuplear = [];
  for(var key in blauthors) tuplear.push([key, blauthors[key]]);

  tuplear.sort(function(a, b) {
    if(b[1].count-a[1].count)
        return b[1].count-a[1].count;
    return (a[1].author.name.$t.toLowerCase() < b[1].author.name.$t.toLowerCase()) ? -1 : 1;
  });

  // output authors:
  document.write('<di'+'v class="blog-author">');
  for(var i = 0; i < tuplear.length ; i++) {
    var item = tuplear[i][1];
    document.write('<di'+'v class="author-line">');
    document.write(replaceAuthorVars(txtAuthorLine, item, i+1));
    document.write('</d'+'iv>');
  }
  document.write('</d'+'iv>');
}
document.write('<script type="text/javascript" src="http://'+window.location.hostname+'/feeds/posts/default?redirect=false&max-results=500&alt=json-in-script&callback=showAuthors"></'+'script>');
</script>

 You can configure some things in the script: maximum user name length, author line template, avatar size, and is avatar cropped or streched. As always, you can also modify the CSS to your liking.

This was "thrown together" very quickly, but it works ok so I decided to publish it. Hope you like it.

Its Done GuYs...
Read more →

Remove The Template View Menu Options When Using Dynamic Views On Blogger

,

Dynamic Views (DV) templates have become a popular choice with some Blogger users.When you choose dynamic views you select a default template which readers will see when they land on your blog.But in a menu under the header readers have the option to view your blog using any of the other six DV templates.
So basically you are giving the readers the choice on how they want to view your blog.But this does not suit everybody, I have recently received a few emails asking is there a way to remove the choose template options on Dynamic Views.Chuck at The Real Blogger Status has also seen some enquiry's about this in the Blogger Help Forum.So, can you remove the options for readers to choose the template ? Yes, and with credit to Southern Speakers and here is how.

Round simple blogger logo orange

Remove The Template View Options On Dynamic Views


OK lets try to explain this as easy as possible.First we will add some CSS to remove all the Dynamic Views options then we will leave the views you want.

Lets add the CSS

Step 1. - In Your (New Design) Blogger Dashboard Click The Drop Down Menu For Your Blog > Choose Customize > Advanced > 


Step 2. Copy and Paste the following code into the Css Section then click Apply To Blog.

#Classic.ss, #views ul li:first-child ,
#Flipcard.ss, #views ul li:nth-child(2),
#Magazine.ss, #views ul li:nth-child(3),
#Mosaic.ss, #views ul li:nth-child(4),
#Sidebar.ss, #views ul li:nth-child(5),
#Snapsnot.ss, #views ul li:nth-child(6),
#Timeslide.ss, #views ul li:nth-child(7)
{
display: none !important;
}


OK this has removed all choose template options, if that's what you want great your done.If you want to leave some options read on.


Now remove from the CSS the templates you Do Want the users to be able to choose from.So for example if you want readers to be able to choose between Magazine and Snapshot the code will look like this :


#Classic.ss, #views ul li:first-child ,
#Flipcard.ss, #views ul li:nth-child(2),
#Mosaic.ss, #views ul li:nth-child(4),
#Sidebar.ss, #views ul li:nth-child(5),
#Timeslide.ss, #views ul li:nth-child(7)
{
display: none !important;
}

 Important - If you look at each of the lines of CSS they end with a comma except the last on.The last option should not end with a comma, so if you removed Timeslide you would also remove the comma after Snapshot and so on as shown below :

#Classic.ss, #views ul li:first-child ,
#Flipcard.ss, #views ul li:nth-child(2),
#Magazine.ss, #views ul li:nth-child(3),
#Mosaic.ss, #views ul li:nth-child(4),
#Sidebar.ss, #views ul li:nth-child(5),
#Snapsnot.ss, #views ul li:nth-child(6)
{
display: none !important;
}


That's it full credit for this post goes to Southern Speakers.Make sure to check out more of our Blogger Tips and Dynamic Views Template Tips.


Drop Your Comments And Questions Below.


Read more →

Brick Style Label Cloud For Blogger Widget

,
Want to Attract Your Visitors With a Hot Looking Sidebar.Then You Might have to Work on it. So Here is a Cool Label Widget For Blogger Which Styles Your Sidebar.For every widget on sidebar there are different styles of customization's.Now this is time for labels widget on blogger with white brick style


See How the Label Widget Looks like:.


Follow the Below Steps to Install the Widget :.


Part-1

1.Go to blogger
2.Layout >> Add a Gadget >> Labels
3.Customize the labels widget as Shown in the below image

customize blogger labels2 in brick style


4. Now Save It.

PART-2
5.Go to Template >> Edit Html >> Proceed.. Check Expand Widget Templates.
6.Search for the below code using shortcut key ctrl+F

 ]]></b:skin>

7. Now Add the below code just before/Above it.


 .label-size{
margin:0 2px 6px 0;
padding: 3px;
text-transform: uppercase;
border: solid 1px #C6C6C6;
border-radius: 3px;
float:left;
text-decoration:none;
font-size:10px;
color:#666;
}
.label-size:hover {
border:1px solid #6BB5FF;
text-decoration: none;
-moz-transition: all 0.5s ease-out;
-o-transition: all 0.5s ease-out;
-webkit-transition: all 0.5s ease-out;
-ms-transition: all 0.5s ease-out;
transition: all 0.5s ease-out;
-moz-transform: rotate(7deg);
-o-transform: rotate(7deg);
-webkit-transform: rotate(7deg);
-ms-transform: rotate(7deg);
transform: rotate(7deg);
filter: progid:DXImageTransform.Microsoft.Matrix(
                    M11=0.9961946980917455, M12=-0.08715574274765817, M21=0.08715574274765817, M22=0.9961946980917455, sizingMethod='auto expand');
zoom: 1;
}
.label-size a  {
text-transform: uppercase;
float:left;
text-decoration: none;
}
.label-size a:hover  {
text-decoration: none;
}


8. Now Save the template and you're Done Adding the Widget.Enjoy

Read more →

Google pushes out free SMS service for Gmail in India

,
Google has added India to its list of over 50 countries that can send free text messages from Gmail, as noted by IBN Live. The new service lets Indian Gmail users send an SMS from a Gmail window to a mobile phone and receive replies as chat messages.


Google pushes out free SMS service for Gmail in India

The feature went live on October 10 for both regular and Google Apps users, according to the report, which noted:

In India the free Gmail SMS service is available on eight major mobile service operators: Aircel, Idea, Loop Mobile, MTS, Reliance, Tata DoCoMo, Tata indicom and Vodafone (Delhi, Mumbai, Kolkata, Gujarat, Andhra Pradesh, Bihar, West Bengal & Andaman and Nicobar, Assam, North East).

 Google’s support page for SMS chat in Gmail lists all mobile operators as available.
Users won’t be able to send unlimited messages, though, as they will have a maximum credit of 50 texts that will be replenished when SMS replies, which will be billed at the standard rate, are received. That system should help curb spammers from using the service without placing an undue burden on users. If a user runs out, credits will slowly recharge, or they can be purchased.
Mobile subscribers who want to opt out of receiving Gmail chat SMSs can choose to block specific users or all messages.
The Gmail texting service should compete with other mobile messaging services that are gaining steam in India. Last month, Whatsapp announced a deal with Indian carrier Reliance to offer an unlimited messaging plan to college students.
Read more →

Tuesday, 9 October 2012

HOW TO USE GOOGLE FONTS IN YOUR BLOG AND WHY TO USE?

,

Choosing the right font is one of the most important things to keep in mind while designing your blog. But most of us tend to use the default standard and old serif and sans-serif family. One of the reasons of using the standard fonts is that it ensures maximum compatibility with almost any browser but it just has a basic normal look. But after the launch of Google Web Fonts you can use non-standard fonts to give a better look to your blog ensuring maximum compatibility. Google fonts till date have 501 font families and more are being added slowly. Some of them are really cool and awesome which can change the whole look of your blog.


This tutorial is divided in 2 parts. First part explains how to successfully use a Google font in your blog or website and in the second part we will have a very short discussion on why should we use them instead of standard fonts. So lets get started.


Using Google Fonts


Part 1: How to Use Google Fonts?


For the purpose of this tutorial we will use a Google font in a blogger template but the procedure is almost same for other platforms.

Step 1: Go to Google Web Fonts and choose your choice of font and click Quick-use. For this tutorial we will use Lobster as our font.

Google Font Lobster

Click on Image for full size

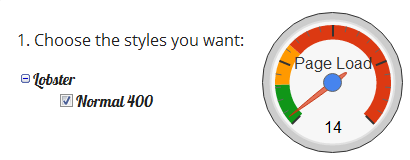
Step 2: Choose the different styles you want for that font like bold, italic, etc. Lobster font only has the normal style but it doesn't matter much. Make sure that the impact on page load time stays in green preferably below 30. If you add more styles or use more Google fonts, then your blog may load slowly.

Google Font Style Load Time

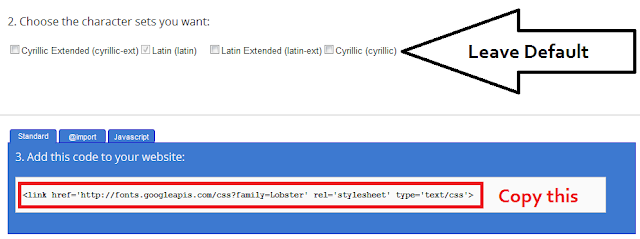
Step 3: After choosing the styles scroll down and you see a line of code. Copy that. You will also have an option there to select the character sets but just leave it to default. Do not close this window or tab, we will need it afterwards.

Google Font-Code


Click on Image for full size

Step 4: Go to Blogger.com -> Template -> Edit HTML -> Proceed.
For old interface go to Design -> Edit HTML

Step 5: Press Ctrl+F and search for <head> tag. Just below that tag paste the code you just copied in Step 3. Now wait, don't save the template or it will give you an error. Right at the end of the code you pasted, replace '>' with '/>' without quotes and save the template.

Edit HTML

Click on Image for full size

Step 6: Go back to the Google font window or tab that left open in Step 3 and right at the bottom you will find font-family. Copy that and use it on the text or section you want you want to use your Google font. Now check in your browser and you will see an awesome display of your text different from the traditional fonts.


Part 2: Why to use Google Fonts?


Why Logo

Now comes the time for a little chit-chat on why we are taking this headache to use Google fonts. Frankly speaking it is a headache if you don't want your blog to look cool, awesome and different from other blogs. Traditional and web safe fonts may give a traditional look to your blog but Google fonts will standout your blog from other blogs. Now, you will say that traditional fonts are web safe and do not have any compatibility issues but my friend, Google fonts are hosted on the web and can be displayed in major browsers like Chrome, Firefox, Safari, Opera and Internet Explorer even if the user do not have the font installed on his/her computer.


Another reason to use Google fonts is that it is SEO friendly as the text remains text and is not seen as an image by crawlers. Also most of the Google fonts are light-weight and won't slow down your blog load time if you choose them wisely.

Conclusion

I guess you are now ready to use and play with Google fonts to beautify your blog ripping the traditional font families. If you have any problem in implementation then feel free to ask and do let us know what do you think about Google fonts and are you going to use them in your blog? We are waiting to hear your thoughts. Cheers :)


Read more →

Hii5 Simple White Blogger Template Download

,
Hii5 Simple Blogger Template provides you with a simple and faster loading design which you can use on your personal or commercial blog. The template is somewhat similar too Simple White SEO template we posted earlier you can check that too + you can also make some selection from our other templates for blogger.


twenty-twelve-template


I THink Guys You Will Like THis!! PLz Drop COmments For HElp & Suggestions...:)
Read more →